Thursday 29 November 2012

Kitchen

I know, sailors call it a galley. Mine's a kitchen.

The underwater sections of the hull all read dry with my moisture meter, except for an area below the kitchen floor. The kitchen floor consisted of foam and a layer of glass. I peeled back the glass:


You can see staining from water. I removed all the foam. The original builder of the boat fitted a floor this way. It's a bad idea. Bilge areas need to be dry and ventilated, or moisture builds up in the glass. Nothing is entirely waterproof - even epoxy coated hulls. Some water always passes through into the glass. If the water can evaporate from the inside as fast as it penetrates from the outside, it can't build up to a level that will allow osmosis to begin. Having water on the inside of a hull as well as the outside makes osmosis inevitable.

Anyway, it was a simple matter to remove the foam, and lay down a more traditional plywood floor. I first epoxied in some supports which greatly strengthen the hull right over the keel shoe I fitted, so that was a nice benefit of the new arrangement. And I think the finished floor looks a lot nicer than the old fibreglass one:


Note the foot pump I fitted by the step, to supply water to the sink. There used to be a hand pump, but washing your hands when one of them is occupied pumping water is just silly. And the pump was flimsy too. This Whale footpump is much more robust, and allows for a great deal of control when hand washing - this is important to me. The more frugal I can be with water, the less I need to carry. Less weight, more speed, or the ability to carry other essentials.

So, I got carried away. New worktops - normal domestic worktops which I modified for a multihull - ie, lightening them as much as possible by using a router to remove much of the chipboard under the surface, and then sealing the chipboard and all edges with epoxy resin.

New hob too. Cookers for boats used to be very expensive. Gas is heavier than air, and any gas leaking ends up in the bilge, waiting to blow a boat apart. So marine cookers need to be fitted with flame failure devices that turn off the gas if the flame goes out. That has now become the required way to supply domestic cookers too, so a stainless domestic cooker is just as good as an expensive 'marine' cooker from a chandler.

I'll make a stainless fiddle that hinged up against the bulkhead that will keep pans in place when the boat is sailing fast through bumpy water. Usually, fiddles aren't needed in a multihull, but I did once lose my chip pan when I hit a rough patch in the Gibraltar Straits. That was messy. So fiddles will be made and installed.


Only two burners on the hob, but I figured that with with a new grill and oven too, we'd manage OK. The little door beside the oven used to be a fridge. Silly place for a fridge, next to the oven. Not sure if a fridge is such a good idea for a cruising boat anyway. It's a big power draw which needs feeding with more batteries and solar panels - more expense, weight, and things to go wrong. I've got by just fine with several summers in the Mediterranean without a fridge, and never missed it. There are other ways to keep things fresh (wrap cheese in cloth, not plastic, keep cabbages and lettuces upside down in nets, allow plenty of air to circulate round fruit and vegetables, and sprout mung beans or alfalfa for salads and stir fries).


Cupboards. 10 of them altogether, 2 drawers, and a great big space under the cooker than could easily take a couple of sacks of potatoes. That space under the cooker used to house a waste water tank, which needed to be pumped out. I got rid of the tank, the pump and two underwater through hull fittings. There are a couple of places that don't allow disposal of washing up water into the sea. I won't go to those places.


Marine taps are expensive too, so I bent a bit of copper pipe. I think it looks quite nice. Well, water comes out of the end and without leaking anywhere else, when you pump the foot pump. And the tap can be turned away from the sink to over the step, when you need to fill a large container.

Just under the tap is a little box with a green light on. The light turns red and the box screams when it detects gas. Handy, just in case a flame failure device on the cooker fails.

This gas detector works very well, but I'm not sure what gas it tests for. It surprised me one day as I was working on the kitchen floor. I was down there on my knees, and did a little fart, and then this piercing alarm went off. I ran around for a little while before I realised what the alarm was, and why it had gone off. :)


That's a big kitchen for a 30' boat. But on a long voyage, there often isn't much to do except read and cook. So the kitchen to me is very important, much as I like reading.

Tuesday 13 November 2012

Nigel Irens' influence on my boat

You know who Nigel Irens is don't you? Famous boat designer?

Well, he's been building a nice motor launch in the same shed as me. He's just finished and launched it, and donated the remaining bits of wood to us catamaran fixer-uppers, including some bits of nice teak faced poplar.


So I made some new drawers for my galley.

Thanks Nigel! Nice to have a bit of Irens input on my boat!


Wednesday 17 October 2012

Fixing 750 holes in my boat.

The curved foam sandwich anchor lockers in front of my main beam were poorly made. I guess the foam and the outer glass skin weren't attached as well as they ought to have been. Anyway, my moisture meter showed water in there, and after drilling a few test holes, I got wet. So I drilled holes throughout the area that read as damp, 30mm or so apart. I then rinsed the foam by squirting water in turn into the holes, and vaccuuming it back out again. I did this many times!

Eventually, I judged it rinsed enough and let it dry out for several months. Readings with the moisture meter dropped into the green zone. It was time to fill the gaps between the foam and the glass by injecting epoxy.

I've injected epoxy before, and it can be pretty messy. Injecting with a syringe can get the epoxy squirted into quite a large area, but as soon as you take the syringe away it comes out again pretty quick. The easiest part of my problem area was vertical, and some of it even tougher, beyond vertical. I was keen to find a way to plug the holes using something that wouldn't be washed away with epoxy. Masking tape is just washed off by epoxy, and so is gaffer tape. Previously, I've found making a circle of builder's filling mastic round the hole, and then putting tape over it makes a leak-proof seal. But I had a lot of holes, so this method wasn't practical.

One day, I noticed a price tag stuck to a filling knife I was using to work with epoxy. The tag remained well stuck  So I bought a roll of 250 price tags. And then cut the roll into three, giving me 750.

I used nearly all of them, but fortunately, I had some assistance. The price tags worked perfectly. They even stuck to the fibreglass that was already wet with epoxy.


Thursday 4 October 2012

Fitting new windows

My windows used to leak. And the Perspex was crazed and foggy.

The old windows were held in place with some sort of mastic and bolts spaced about 3 inches apart. The leaks were mostly around the bolts, though the worst window leaked most because, as I discovered when I removed it, the plastic film that protects Perspex when it was new had been left in place.

I wanted to get rid of all the bolt holes. As well as being prone to leaking, they provide stress points in the Perspex. Around many of the bolt holes, there were clear signs of cracking in the old windows.

I have just finished fitting my new windows for the second time. The first time, I used the instructions I found here. The windows leaked within days. The paint I used was paint used for car exhaust pipes, as suggested in the article. But the article is Australian, and I am in the UK, so maybe the paint here is different. Anyway, it didn't work. The windows failed in the join between the paint and the mastic/tape. On removing the windows, I was disappointed with the performance of the tape. I'd expected it to be easy to remove from the Perspex, as the paint hadn't provided a good surface for it to adhere to, but it also easily came away from the hull. I don't know why that is. That 3M double-sided tape is recommended all over the net. All I can say is that it didn't work for me.

The second time around, I've used Sabatack 780, and their very expensive UV protective primer (£33 for a tiny bottle - but it was enough for my 15 windows).

It's important to use spacers between the window and the hull to get the right thickness of mastic - too much is both expensive and ugly. Too little doesn't allow enough flexibility between the Perspex and the hull. Perspex expands and contracts with temperature change much more than fibreglass, so some flexibility in the connection is crucial. I used little squares of hardboard glued to the hull (3.5 mm):


It's important to place the windows correctly first time on the hull after you've applied the gloop - trying to adjust the position once the gloop has made contact with the hull makes a mess. I did a dry run for each window, and drew a pencil line round the windows. I then glued some bits of wood in place to help guide the window to the correct position. I used plywood, but it would have been better t use some thicker wood so that the windows is guided into place from a greater distance from the hull. I wanted to glue the wood to the hull in such a way as to allow me to remove it easily without damage. Here's the trick to that:


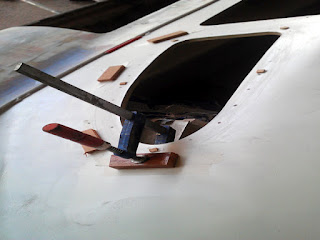
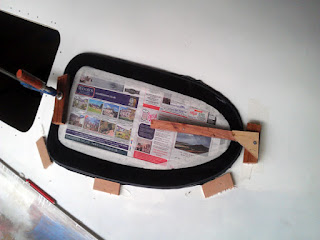
Stick some masking tape to the hull where you want the wood to go, then use 5 minute polyurethane wood glue to attach the glue to the tape. The wood blocks can be easily removed with a chisel without damaging the hull, but the wood is stuck down well enough for locating the window, and can even be used as a base for clamping the window down. Here's a window that wasn't quite bent enough - I just clamped it down onto the spacers until the mastic had set:


The Sabatack was easy to clean up with a chisel the next day. It seems to go hard quite slowly, though you are supposed to put the window in place within 8 minutes of applying the glue.

It all seems to have worked well. I got 15 windows glued in and cleaned up in two days. That feels like progress at last. How waterproof and strong they turn out to be, only time will tell.

Six days later....

Only after I'd stuck in all the windows did it occur to me to test this system. Oh well, better late than never. I cleaned some scrap Perspex with isopropyl alcohol, applied the primer, left it to dry for 10 minutes, then glued on some scrap fibreglass using a narrow bead - as I'd done for the windows. After six days, I tore the pieces apart:


That's 10 mm Perspex under the crow bar, and 15mm foam sandwich on top. It took a lot of effort to break it apart! Now I'm certain the windows are securely installed. I checked where the glue failed - I'd expected the primer to tear away from the perspex, or the glue to come away from the primer. But those interfaces held! The glue tore away down the middle of the bead - and here it was still tacky. So I guess, even after six days, and having reached this fantastic strength, the glue would have become even stronger if I'd left it longer.

:)

Update: 2 and a half years later, mostly in the tropics, the windows are still fine. No leaks at all, no sign of any loosening.

Friday 14 September 2012

Water - catching rain

I've fitted a water catching system to the coachroof.

I have a friend who sailed round the world using only the rain water that fell on his coachroof - and his coachroof is quite a bit smaller than mine.

But why bother? I have 2 x 150 litre tanks. On a recent trip from the Azores to the UK that took eight days, I used just 25 litres of water, and that included using fresh water for cooking and to wash up. So I guess I could eke out my water for 300/25 x 8 = 96 days. However washing was minimal (I was sailing alone), and I did no laundry.

It would be nice to be able to take a shower. And to wash clothes in fresh water. And to rinse the salt out of clothes that become salty (otherwise they never properly dry).

I could do all those things using rain water. And to replenish my drinking water, I could pour the collected rain water through a filter - they make them so fine these days that they filter out even things as small as viruses. Rain water fed directly to the main tanks would be silly - I have no desire to drink water contaminated with seagull poop.

It seems a no-brainer. The alternative is to carry lots of water (300 kgs for full tanks), and be reliant on shore supplies (which often means using a marina, which I intend to avoid as much as possible). Or to install a water maker. That's expensive, to buy and to maintain. And it needs a lot of power, so it needs lots of solar panels or a generator. To rely on the sun or a generator, and a water maker for a supply of water seems less secure than relying on rain.

It seemed a good opportunity to fit the catching system - I've just removed all the car body filler that had been used to fair the boat, and refilled using epoxy filler (car body filler absorbs water - a pin-prick through the paint results in filler absorbing water and eventually causing blister and then more holes in the paint). After fairing in the coachroof, I used a hot glue gun to attach to 15mm plastic plumbing pipe to the bottom of the coachroof. I then used epoxy filler to fill the space under the pipe, and create a gutter. I used release mould on the pipe - but this wasn't necessary. Epoxy doesn't stick to the pipe anyway.

After pulling the pipe away, I glassed over the filler underneath and on top.


The red and blue colour in the photo is epoxy filler - I added red or blue builder chalk to each mix of filler, to make it easier to see what I was doing when it came to sanding t smooth. (Currently the boat looks very badly bruised!).

I left a gap where I want the water to run out when I am not collecting, and drilled a hole through the deck just uphill from the gap. In the deck hole, I epoxied a long plastic pipe insert (standard plumbing part, 40p!) which is the right size for push-fit plumbing fittings. The pipe comes out behind a bulkhead in the kitchen, so it will be easy to attach some plastic pipe to the inlet leading to a tap which I'll set at the height of my water containers.


Update: I'm anchored in Turks and Caicos, and water costs $2/gallon. There are no taps anywhere but in marinas, which are $50 a night. We're living on rainwater that arrives in occasional squalls. Crap from seagulls seems an English problem, or northern European anyway. I can't remember how far south we had to go before bird shit wasn't a problem. Anyway, south of Portugal and in all of the Caribbean, all we need to do is let the first water wash dust  and salt off the roof, then collect the rest. It is a lot of work though, carrying the containers up to the deck to syphon them into the tanks. Despite my initial reservations, I think it would be much better to plumb the rain catching system directly to the tanks, with a diverter tap for discarding the first water.

Tuesday 14 August 2012

more problems with the front beam

Stripping the old fittings from the aluminium beam at the front of the boat, I was disconcerted by the sight of how much corrosion there was:


And strangely, there was dampness underneath, despite the boat having been under cover for a couple of months.

I drilled a hole in the bottom, and 3 litres of water poured out, which tasted salty.

I drilled a couple of holes in the top, the same distance apart as the camera lens on my phone, and the flash, and took a snap through the hole:


There's a rivet at the bottom I'd drilled out previously, dropped onto what looks like yellow sludge. Not knowing how much corrosion this water might have caused, I had not choice but to cut out the beam:


Sludge in the ends too:


It looks like gold dust, but it seems to be very fine clay, which I guess got in there the same way as the water - through the places where the rivets are - that is the only possibility.

Anyone with a catamaran with a beam that is embedded into the hulls and which has any rivets in it would do well to drill a small hole in the bottom to check for water inside! Bad design! I think embedded beams can be OK - it is surely a strong connection, but if the beam is not entirely water-tight, there'll be trouble, and rivets can't be relied upon to remain water-tight.

The good news is the extent of the corrosion in the beam - it's not enough to require a new beam, but enough that it was essential that it wasn't allowed to progress further. A bonus is that I will now be able to tweak my plans for the new arrangement with a seagull striker, because I can now easily transport my beam to the welding shop and have the new fittings welded on instead of clamped on as I'd planned previously.

Here's a beam stump ready for laminating over:


A piece of ply was used to fill the space where I've removed the foam, and the whole lot glassed over with biax. The ply knees and other structure I built into the hull to support the beam can be used to give support to the aluminium pads I've have made to provide support to the new beam.

Here's the modified plan:


Off to the welders!

Sunday 29 July 2012

Some arrangements for fitting a storm jib.

I am going to a lot of trouble to give the boat a storm jib, mounted on a removable inner forestay. I think a storm jib is a sail that is often left in the bag on a boat - few people use them. But I have sailed all the way from the Canaries - Madeira - the Azores - UK under storm jib for 95% of the trip. I had wind on the nose varying from F6-8 all the way. I'd gone as far west as the Azores to pick up the south-westerlies to get me back to the UK, and did indeed set off from there with a fair wind, but it only lasted 12 hours. Then I was back to the storm jib and either double or triple-reefed main all the way to Start Point, all of it close-hauled.

I had an inner forestay on that boat (a plywood 32' monohull) which I'd fitted specifically for taking a storm jib but I did experiment with hanging the storm jib from the main forestay, to see how it might work. I could go to windward alright, but at only 2-3 knots. Hanging the storm jib from the inner forestay, so that it just about overlapped the reefed main, I got 6-7 knots. For two weeks crashing through waves all the way from the Azores, I was very glad to have that sail and that rig.

Besides allowing me to continue sailing at a reasonable speed in strong winds, the storm jib also allows me to sail slowly in lighter winds - to await daylight before entering a new harbour, to catch up on some rest, or to go fishing. I have already fitted a catwalk between the front aluminium beam and the front of the saloon, but I need bobstays to counteract the upward pull of the inner forestay.

The bobstay fittings that were previously used for the front beam were no use - they were fitted too high for one thing, making the angle too shallow. And the support inside the hull was inadequate too:


In the bows of the boat, a floor is glassed in about 20 cm above the water line. A block of wood has been glassed onto the wall of the hull at floor level to take the load of the old bobstays. I don't think this is strong enough, or low enough. The yellow area behind the text in the image above is a hole I dug through the floor and through the foam that fills that area to place a new load bearing construction.


I used a grinder to cut through the floor - which was surprisingly substantial - an Airex sandwich. And then a wire brush on a drill to pulverise the foam underneath with a hose from a vacuum sucking away the dust.

It would be crazy to do such work in such a confined space without the benefit of an air-fed mask:


These masks sell for £6-700! I was lucky to find one at the local dump, and acquired it for £3. It had no battery and the exhaust valve was ruined. Replacement parts are also very expensive, so I had to adapt it a little. A 6v battery charger wired in to the motor runs the fan, and a vinyl glove with the ends of the fingers cut off works like the valve. An old filter cut down and glued to a flexible pipe allows me to work with either filters or a tube leading to a supply of fresh air. The fan is a bit noisy, and I feel pretty constricted working in it, but I get fresh air to my face and so don't have to breathe either fibreglass dust or epoxy fumes. Ear defenders and a set of plastic overalls for epoxying add to the discomfort. I'm also working in a space where I can just about sit up... but that's enough wingeing! Back to work!
I glued a pad of plywood to the surface of the inner skin of glass with epoxy and fillers. I then glued in a plywood floor, and plywood to the front and back of the hole. I filleted the joins, and glassed it all together with epoxy and biaxial glass. From the outside, I ground away the outer skin, and the foam underneath, and filled the hollow with many layers of epoxy and glass:


In this way, there is no foam where I will attach the bobstay fittings - just solid glass and epoxy. And the load is spread between the outer skin and the inner skin, and via the plywood construction to the inner skin of the other side of the hull. I will use a stainless steel backing plate to spread the load of the nuts of the fitting evenly.

I think this structure is so strong it would be suitable for attaching my anchor bridle too, which I'll bear in mind when choosing the fitting I'll use here.

Phew - several days work grinding and epoxying to create a thing probably no-one will ever see or appreciate, except you reader! Thanks for your attention!

Thursday 12 July 2012

Improving the front beam

Here's the front beam of the cat:


There's a bridle from the middle of the beam to close to the water line on each hull. I don't like this set up.

The angle of the bridle seems too small - the forestay is under great tension when the boat is sailing to windward, and the tension in the bridle must be greater still given such a small angle. I suspect the hull fittings must be under great load, and though the moisture meter doesn't suggest any water leaking around these fittings, it just seems a matter of time. The builder of this boat wasn't too clever about keeping water out of other places! Like where the beam passes through the hull for instance:


I've scraped away some gel coat at the top of the join. There's a fillet of resin and glass around the beam, but the resin is polyester, not epoxy, and there are places where the fillet is pure polyester resin with no glass or filler in in - it is just brittle resin, with very little strength.

Water has entered the join on each side. The beam passes right through the hull and is bonded to thick plywood above and below the beam. This is a very strong arrangement - or it was, until water softened the plywood. It had even begun to rot in the starboard hull.

I climbed in the little compartment in the forepeak (really small, as the bottom half is a watertight compartment filled with foam) and loosened the bridle attachment fittings. Both fittings were quite bent:


Those really aren't the best fittings for the job anyway. They aren't designed to withstand such forces from an oblique direction.

Time for a total redesign. Googling Richard Woods and Sagitta, I noticed that on the first of these boats that he built, he had a seagull striker rather than a bridle. This is an arrangement I much prefer - no through hull fittings near the water line, no wires below to cause trouble with mooring buoys, anchor ropes, people in dinghys, or my head, when I am walking around under the boat and forget the wires are there.

Anyway, here's my plan for retro-fitting a seagull striker:


I've drawn up plans to hand over to an aluminium fabricator. All the tangs and fittings for rollers are welded to two-part sleeves that can be bolted over the beam. I have anchor rollers on each side as well as the central one - you often need more than one roller, but positioning them here allows me to also use them for a sea-anchor bridle. The sea-anchor lines can be easily led back to the sheet winches.

I'm replacing the plywood around the beams, but will be using epoxy. The plywood will get a couple of coats of epoxy before I glass them in, to ensure they don't become wet.

I'll make a small epoxy/glass strand and filler fillet round the beams where they enter the hull - for strength rather than waterproofing. Over the join, I'll make a thick fillet of Sikaflex to seal it.

That should fix it!

Wednesday 11 July 2012

Dealing with delamination from the core.

Delamination is the nightmare scenario for the owner of a boat made of composite materials. It means the core is loosened from one or both of the skins, and the strength of the delaminated part is severely compromised. Usually it is caused by a leak of water into the core, and in time the fibreglass and the core become separated.

My moisture meter led me to suspect just one area on the boat may have delamination, although the usual test, tapping on the hull sides to detect a hollow sound wasn't very persuasive. To check, I drilled a hole and water came out, so I drilled some more all around the area that read 30 (full scale) on my moisture meter:


The hole at the top left of the image is a drain pipe from my forward hatch guttering. You can just make out a pencil line around the drilled holes which shows the extent of the delaminated area. It seems the pipe has leaked water into the core and it has delaminated an area of less than 2 square feet.

After draining the water out (maybe 50-100 ml), I left the hull to dry. A week later, the moisture meter still read 30. I paid a visit to a neighbouring catamaran where all the gel coat has been peeled off and the hulls left to dry out since last August - with the wetter areas warmed more recently by heat lamps. His wettest areas also read 30 on the meter, although we couldn't get any water out. Still, this suggested that hoping water trapped between the fibreglass and the core would evaporate out of the little holes was too optimistic.

I inserted some toilet paper wicks:


They helped a lot, and at first, the readings came down a little, and then stopped.

I googled a lot, and found that just removing the water won't be enough. The water contains solvents - either salt, or solvents from parts of the resin that has dissolved. If the solvents aren't removed, the water will never go from the core. Imagine trying to dry out a sweater that has been wet with sea water - it will never be properly dry until it has been rinsed in fresh water. And even if you dried the sweater but left the salt in it, it would absorb moisture from the air.

As it happened, I'd just bought a new vacuum cleaner, a Vax carpet cleaner, and noticed that this model has a little water pump in it, so that it is equipped to pump water through a small pipe. Just the job! I added food colouring to the water so that I could see the water behind the fibreglass. The result was spectacular!

The holes I'd drilled just happened to be the same size as the water pipe. Inserting the water pipe in one hole, and sucking with the vacuum on another, the water was plain to see flooding the delaminated area. What was also plain was the the moisture meter had allowed me to accurately outline the delaminated area - water didn't penetrate beyond my pencil line. Using different holes for the pipes, I was easily able to flush everywhere in the area. I then just sucked as much water out as I could get, and put some new toilet paper wicks in. Out of curiosity, I tested the area again with my meter:


It now reads just 16 units at the bottom of the delaminated area, and read just 5 at the top. This was immediately after flushing, when clearly the area behind the fibreglass was still wet. What was going on?

I guess the meter reads capacitance of the material it is measuring, which must be related to the conductivity. Pure water is a poor conductor, but water containing solvents is much better. I guess removing the solvents was the cause of the lower readings. Anyway, with now just fresh water behind the fibreglass, I left the wicks in place, with the intention of warming the area later with heat lamps to remove the last of the water. I monitored the meter readings every day, and found to my surprise that the readings went down, then up again. I figured the remaining water had dissolved some more solvent and rinsed again. Again, the readings dropped, and then went up a little. In the end, I rinsed the area three or four times, and now the readings are just slowly falling. After a few days with heat lamps, I'm confident that the core will be dry enough to allow me to inject some epoxy resin, and job done.

My progress was monitored by other people in the yard, and they liked what they saw, so we treated the other catamaran in the same way:


With two of us on the job, I was able to take a photograph of the operation this time! The numbers on the hull are the moisture meter readings. It's not so plain to see that water behind the layup in this photo, but we could see it pretty well. This boat also needed several rinses before the readings stayed down. This cat now has heat lamps on the area, and the readings are coming down - as they never did in the last 8-9 months. Clearly, rinsing is an essential part of treating delamination!

Once the area was dry, I tried sucking epoxy into the affected area. I closed all but the highest and lowest holes off with tape, connected a vacuum to the top hole and a tube full of epoxy to the bottom hole and... it didn't work. The epoxy needs a little filler in it to reduce its brittleness, and it was too thick for the vacuum to pull.

Much better was to use a syringe. I added some red chalk powder to the epoxy, so that I could easily see where it went. That worked great! The are now looks like it is bruised, with the red showing through, but I know it is now well sealed from water, and the skin and foam are properly bonded. It'll paint over just fine!


Wednesday 27 June 2012

My poxy hulls

Some small blisters on the topsides have led me to learn a lot more about my hulls.

I'd sanded the topsides, expecting simply to add another couple of coats of paint, but noticed some small blisters. Normally, a sign of osmosis, but I wasn't worried about that because I'd already removed all the antifoul from the underwater parts of the hulls, and they are in fine condition. Half a dozen blisters in total I should think. Moisture meter readings fine. And a bit of sanding below the antifoul suggested that the layer of paint on top of the gel coat was probably epoxy barrier coat. I did my best to leave this as intact as possible. I intend to add a few more layers of epoxy under the water line, and then add Copper Coat.

So I wasn't wasn't worried about the small blisters on the topsides. I just sanded them out. But then they started weeping some brown ooze.

You can see brown patches around the holes in the paint. Well, I had to investigate further:


So here's some paint scraped away.Under the white gloss, there's a blue undercoat I can't identify, but it may be an epoxy high build coating. The brown stuff I suspect is car body filler. Wherever I found pox in the topcoat I found body filler underneath. This theory was shaken a little when I found the blue paint under some pox in one section of the hull, but after a little sanding, I found filler under the blue paint. I was curious that the only places on the hulls where there was no pox at all, was under the saloon. I wondered whether the heat of the sun on the hulls had something to do with it, but I now realise that those areas were never filled - just painted over.

If I ever wanted a coating on the topsides that was durable, I'd have to remove all the body filler. I'd have to strip away all the paint. After spending days scraping away the antifoul, this wasn't a pleasant prospect, so I went home to do a little googling.

A steamer used for removing wallpaper proved to be the tool I needed. I wish I had tried it on the antifoul. 15 seconds steaming is all the is needed for the paint to peel away in strips, not damaging the substrate underneath at all. Of course that high temperature could damage the fibreglass if I left the steamer on for longer, but 15 seconds is enough to peel the paint, leaving the hull underneath just a bit warm. 

I've now removed all the paint from a hull and a bit - it will all be done in a couple of days. And the filler is easy to sand away.

My hulls were constructed in this way - the underwater sections were made in a mould up to the level where the hulls flare, 2-6 inches above the water line. The hulls above that level have been made by bending on flat panels. These panels have no gel coat on, and sanding through the paint and filler (being very careful not to sand below that into the glass) shows the laminate underneath to be really excellent. No air bubbles at all. No dry glass fibres. It seems to have been an excellent layup, and very fair. Naturally, where the panels have been joined, there needs to be some filling and fairing, and some of it has been done with epoxy fillers:


The white area on the left I believe to be epoxy-based filler. Unfortunately, this has been applied leaving small air bubbles, which has probably caused some solvent entrapment in the paint applied on top. On the right is some more body filler! What a shame the builder switched to using this stuff! According to my moisture meter, the body filler is dry, but it feels damps, and some of it is fairly soft. I think it has absorbed solvent from the paint applied on top - it doesn't smell of styrene.

In 2-3 days, all the paint and body filler will be gone. The hulls look terrible, but what I am left with is excellent. I intend to replace some of the body filler with epoxy-based filler where it really needs it, but I have no intention of filling and fairing forever. A fellow with a cat in the yard spent two months filling and fairing, and his boat does look brilliant. But I want to go sailing. I'll fill and sand enough to give a really good surface to be painted over, but I won't be applying filler to large areas in an attempt to take out some of the waviness of the hull. It's only slightly wavy, only enough that a boat-builder or surveyor would notice. I'm more interested in the durability of the work I'm putting into the boat than trying to make the boat look flawlessly fair. Life's too short for that.

I'll make the topsides smooth and fairly fair, add 2-3 coats of epoxy primer, and then some International Brightside - that's what I'm stripping off at the moment, and I think it would have been fine if I've originally painted it on a good sound surface.

Monday 25 June 2012

Important little details

I'm spending most of my time filling and sanding, and most of the rest of my time sanding and filling. I spent nearly £300 on a fancy Makita sander, and wore it out in a fortnight. Fortunately, it was replaced under warranty. The break gave me a chance to rest my arms and attend to some small but important jobs.


This is the aluminium beam at the front of the boat. I've hacked away some of the material that was bonding it into the hull. It was partly solid polyester resin, with some glass/resin on top. It didn't work as a seal. Water was able to penetrate along the beam and reach the plywood bulkheads inside the boat that support the beam. The ply has softened to the extent that I have had to remove it all, and will replace it soon. Not a big job, but it is essential that that plywood is intact. I'll replace the polyester around the beam with epoxy, but since I doubt even epoxy would seal the beam due to differences in the rate of expansion/contraction with temperature change between the beam and the hull, I'll also add a thick layer of Sikaflex round the join. The Sikaflex is flexible enough to accommodate the differences.


This guttering around the inside of the forward hatches allows the hatches to be flush with the deck, which is a nice tidy setup, that allows any green water to quickly go over the side of the deck rather than piling up against an upstanding hatch edge. But still some water managed to find its way into the hatch, so I've raised the edges of the guttering with epoxy and glass, and then sanded it down bit by bit until the hatch is once again flush with the deck, but there is only a very small gap between the bottom of the hatch and the top of the guttering. Only a small amount of water can now get past the edge of the hatch , and the size of the guttering and drains ensures it will drain away before the next wave sends more water over the deck. This job took quite a lot of time and effort - it involved going into the hatch, pulling the lid over and marking where the edge of the guttering needed sanding down, then trying the hatch lid on again, then more going inside, marking etc. 

There may be times when water is frequently sprayed over the deck. If even a little of it gets inside, it would accumulate and the forward section of the boat would lose buoyancy.... anyway, this fix should solve that issue.


Here's a wooden mini-keel I added a couple of years ago so enable the boat to sit on a beach without damage from stones. There was a problem with the hull flexing a little at the aft end of the mini-keel if the slope of the beach made the boat sit heavier at the the aft end. So I supported the boat by putting some big blocks under the hull beneath the bulkheads that are attached to the main beams and removed the supports that were under the mini-keel. I appreciated the fact that the boat is light enough that I was able to do with with just wooden blocks, wedges and a lump hammer. Once the weight of the boat was taken off the mini-keel, I epoxied a plywood framework inside the hull to strengthen it:


Now, back to the sanding....

Sunday 3 June 2012

Boat dismantling

Lot of work to do, so it's reassuring to have a neighbour in the boat yard with a big catamaran and even more work to do:


This is a 39' Catana, with the gel coat stripped away and the hull drying out before re-coating with gel coat. It will be drying for several months in the shed before it's ready for the new gel coat.

Fortunately, my hulls are fine. Only the decks have leaked, but the damage is quite a bit less extensive than I'd expected. Still, there there are holes in the gel coat on the coachroof that can only be dealt with properly under cover, and I have a piece of plywood to replace on one of the bows - the plywood is meant to provide the strength for a big cleat which will take a lot of strain anchoring, mooring or riding to a sea anchor, so that needs to be reliable. I'll replace that next week.

An extra job I hadn't anticipated is the removal and re-installation of all the windows. I did this recently, but on close inspection, it was clear that a couple of the windows were no longer bonded well to the coachroof - so they all had to come off as losing a window at sea could be catastrophic. I'd followed the instructions here for fitting windows without using bolts, but the paint I used on the windows failed. I'll try again, but without priming paint on the windows this time, having the Sikaflex directly in contact with the coachroof. The 3M double-sided tape was disappointing too - it was ridiculously easy to remove from the windows. It was supposed to provide much of the bonding strength. I'll use bits of it again, but only enough to hold the windows in place while the Sikaflex cures. I'll protect the Sikaflex from UV with some paint on the outside of the windows, round the edge.

Oh well, with windows out I can use grinding and sanding machinery more easily.

Since replacing the toilet, holding tank, valves and through-hull fittings with a simple composting toilet, I've got the bug for removing anything more complex or less reliable than it needs to be.


This corroded lock for the stern locker won't be replaced. All locks corrode, unless you pay a lot of money for them. And a fancy lock might suggest something worth stealing behind them. I'll fill the holes, and attach a rope to the inside of the locker lid which extends through the bulkhead into a cupboard in the bedroom. To lock the lockers, just pull the rope tight and press it into a jam cleat. Nothing can go wrong with that! And would-be thieves won't know where to start to open the locker.


Here's a water filler top that won't be replaced either. The new pipework I installed on the boat doesn't fit this, so I left it disconnected while I tried to think of a neat way to make the connection. But the rubber seal on this fitting needs replacing too, which is a hassle to find or to make. Without a decent seal, drinking water can easily be contaminated with sea water. And the screws into the deck leak water into the deck. Solution? Get rid of it! The pipe that leads to the water tank leads to the stern locker. This fitting is in the deck of the stern locker. If I just get rid of it, and leave the pipe loose in the locker, I'll have no screw holes in the deck to leak, no seals to maintain, and no chance of sea-water getting in. Filling the tank means just lifting the end of the filler pipe out of the locker and putting the hose in. Which is no more inconvenient than getting the winch handle to unlock this fitting. Of course I'll have to tie the end of the pipe up under the deck to prevent my water syphoning out, and stick a cork in it for good measure.

A weak point of the Autohelm steering system is the plug/socket arrangement to connect the actuator to the power supply and data feed. When I bought my Autohelm, I didn't wait for this fitting to leak and corrode - I chopped it off immediately and replaced it with some highly recommended gear!


But you can see it is beginning to corrode, and I had to fiddle about with it to get it to work on my trip up the river. So this has to go too. This is also screwed into the deck above a stern locker. That stern locker has a ventilation pipe close to this fitting - I'll use a plug and socket system that isn't screwed into the deck. I can pass the lead with the socket on through the pipe when I want to connect up the Autohelm. The connection can be shoved back down the pipe where it will mostly be protected from water. And when not in use, the lead can be left in the ventilated locker, where it is very dry due to the continuous ventilation I've built in.

Let's see how much further I can minimise boat maintenance during this refurbishment!