My windows used to leak. And the Perspex was crazed and foggy.
The old windows were held in place with some sort of mastic and bolts spaced about 3 inches apart. The leaks were mostly around the bolts, though the worst window leaked most because, as I discovered when I removed it, the plastic film that protects Perspex when it was new had been left in place.
I wanted to get rid of all the bolt holes. As well as being prone to leaking, they provide stress points in the Perspex. Around many of the bolt holes, there were clear signs of cracking in the old windows.
I have just finished fitting my new windows for the second time. The first time, I used the instructions I found
here. The windows leaked within days. The paint I used was paint used for car exhaust pipes, as suggested in the article. But the article is Australian, and I am in the UK, so maybe the paint here is different. Anyway, it didn't work. The windows failed in the join between the paint and the mastic/tape. On removing the windows, I was disappointed with the performance of the tape. I'd expected it to be easy to remove from the Perspex, as the paint hadn't provided a good surface for it to adhere to, but it also easily came away from the hull. I don't know why that is. That 3M double-sided tape is recommended all over the net. All I can say is that it didn't work for me.
The second time around, I've used Sabatack 780, and their very expensive UV protective primer (£33 for a tiny bottle - but it was enough for my 15 windows).
It's important to use spacers between the window and the hull to get the right thickness of mastic - too much is both expensive and ugly. Too little doesn't allow enough flexibility between the Perspex and the hull. Perspex expands and contracts with temperature change much more than fibreglass, so some flexibility in the connection is crucial. I used little squares of hardboard glued to the hull (3.5 mm):


It's important to place the windows correctly first time on the hull after you've applied the gloop - trying to adjust the position once the gloop has made contact with the hull makes a mess. I did a dry run for each window, and drew a pencil line round the windows. I then glued some bits of wood in place to help guide the window to the correct position. I used plywood, but it would have been better t use some thicker wood so that the windows is guided into place from a greater distance from the hull. I wanted to glue the wood to the hull in such a way as to allow me to remove it easily without damage. Here's the trick to that:

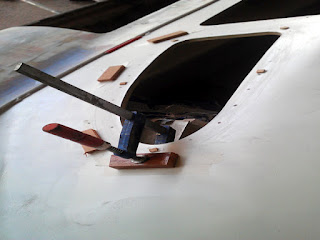
Stick some masking tape to the hull where you want the wood to go, then use 5 minute polyurethane wood glue to attach the glue to the tape. The wood blocks can be easily removed with a chisel without damaging the hull, but the wood is stuck down well enough for locating the window, and can even be used as a base for clamping the window down. Here's a window that wasn't quite bent enough - I just clamped it down onto the spacers until the mastic had set:
The Sabatack was easy to clean up with a chisel the next day. It seems to go hard quite slowly, though you are supposed to put the window in place within 8 minutes of applying the glue.
It all seems to have worked well. I got 15 windows glued in and cleaned up in two days. That feels like progress at last. How waterproof and strong they turn out to be, only time will tell.
Six days later....
Only after I'd stuck in all the windows did it occur to me to test this system. Oh well, better late than never. I cleaned some scrap Perspex with isopropyl alcohol, applied the primer, left it to dry for 10 minutes, then glued on some scrap fibreglass using a narrow bead - as I'd done for the windows. After six days, I tore the pieces apart:
That's 10 mm Perspex under the crow bar, and 15mm foam sandwich on top. It took a lot of effort to break it apart! Now I'm certain the windows are securely installed. I checked where the glue failed - I'd expected the primer to tear away from the perspex, or the glue to come away from the primer. But those interfaces held! The glue tore away down the middle of the bead - and here it was still tacky. So I guess, even after six days, and having reached this fantastic strength, the glue would have become even stronger if I'd left it longer.
:)
Update: 2 and a half years later, mostly in the tropics, the windows are still fine. No leaks at all, no sign of any loosening.


